
(25 years ago a 13.1 inch scope was considered big,,,how times change).
We were lucky and got a decent mirror.
Today, neither of us wants to lug 120 pounds of scope around,
so the idea of putting "Big Red" on a diet was born.
Our goal was simple,
A light scope to "grab and go" outside to view the heavens,
no tracking, nothing fancy, just like the original.
This was my first build following the
Cloverscope.
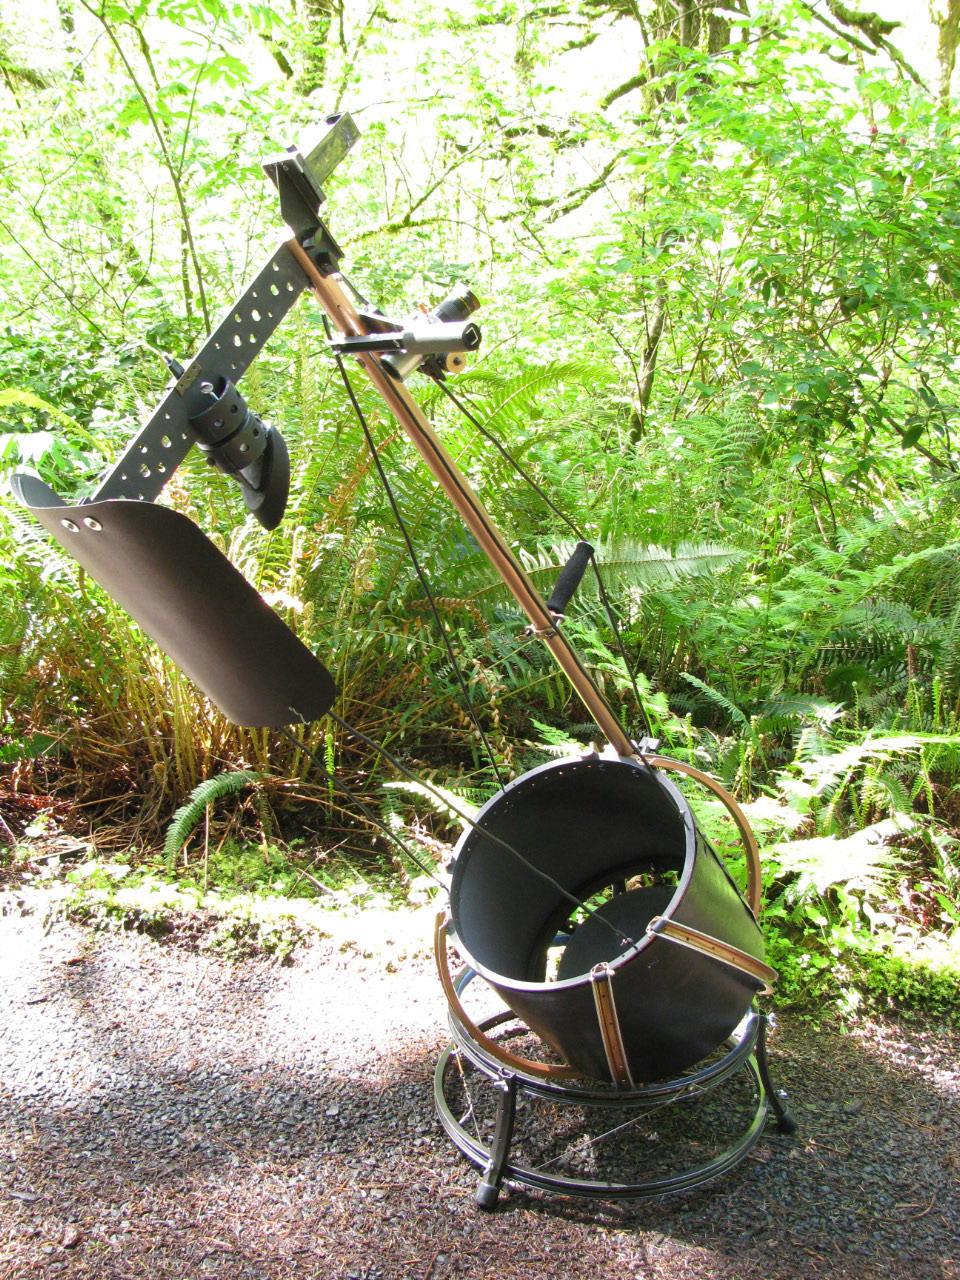
I decided to go with Toms' three tilted blade Sudiball design.
I also wanted to see if I could build a scope that would require very little if any counter-weight.
I reasoned that if I could get the mirror low enough in the ball, I Just might be able to pull this off.
Weight savings also prompted me to consider using a single strut.
I have played around with mono-strut scopes in the past, but with limited success.
Years ago at OSP (Oregon Star Party) I saw
Ken Lulay's 12.5" string scope.
It's simplicity has always intrigued me
I wondered if by stressing just one strut of the design I could eliminate the other?
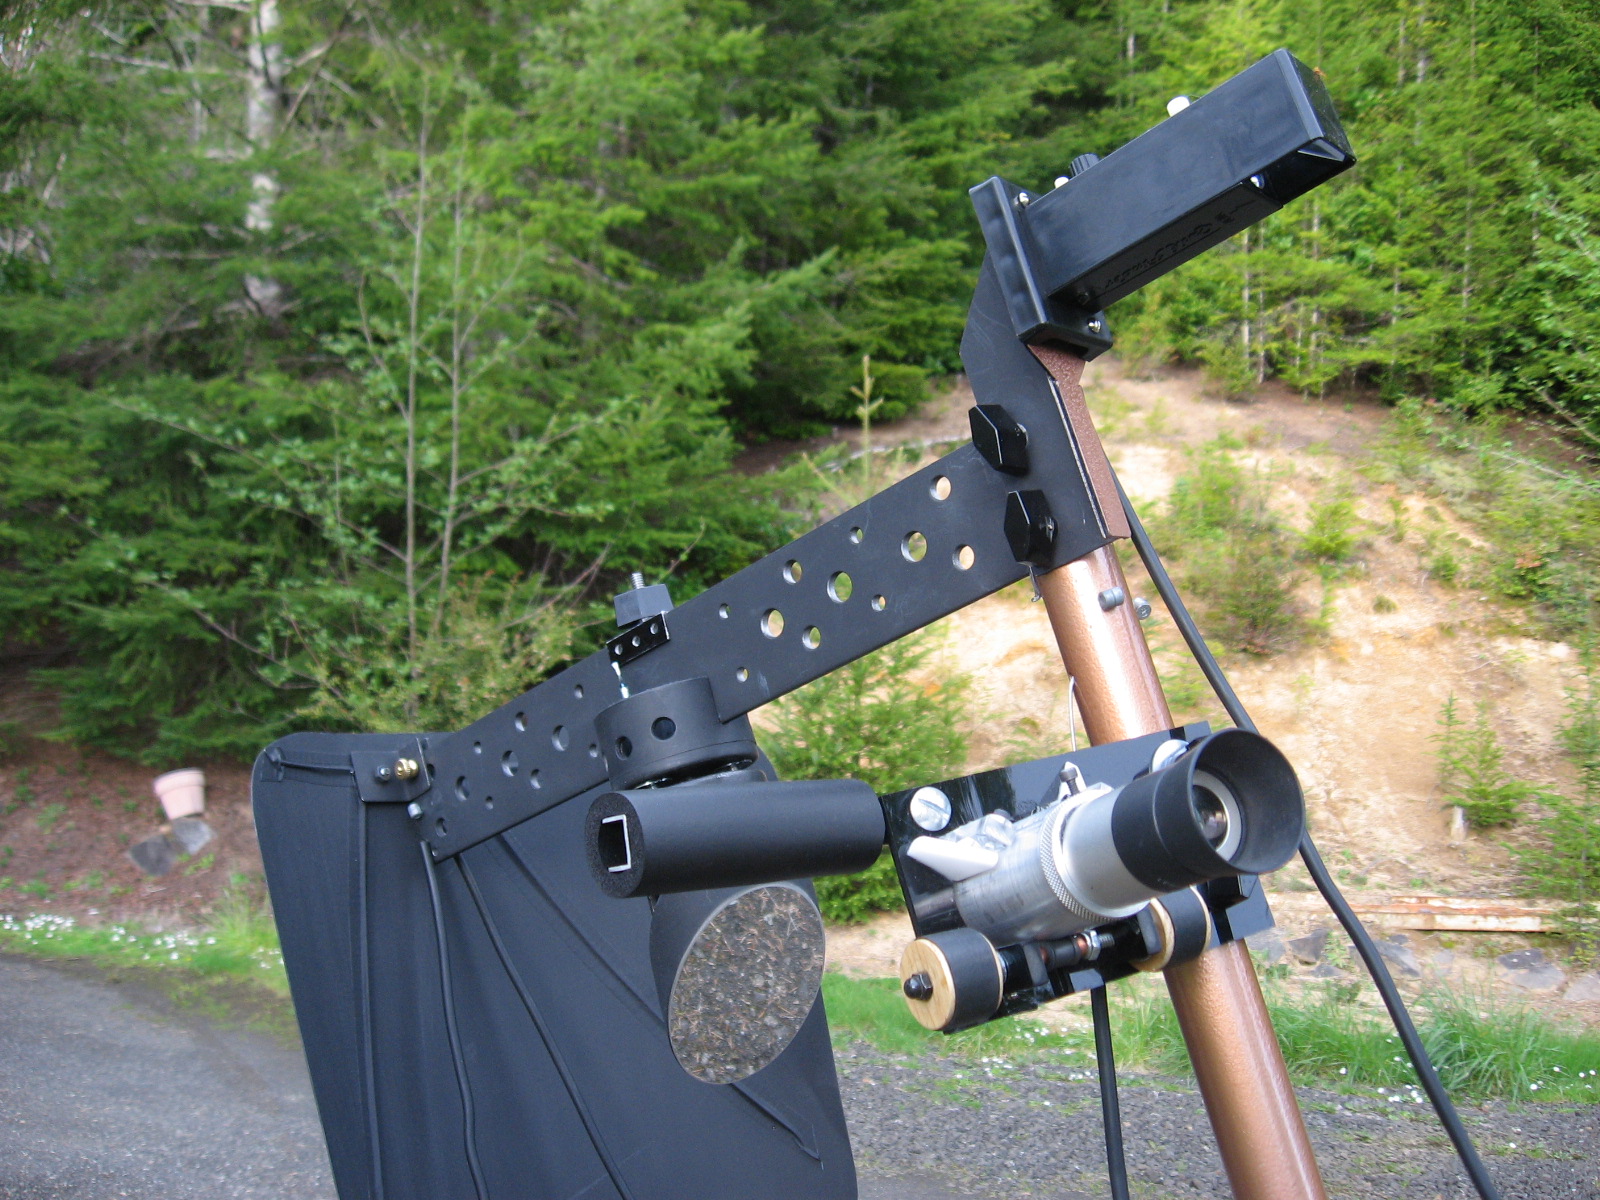
What I decided on is a strut braced by five cables.
The key is that the back cable has a pylon, like a cable-stayed bridge.
Volunteering at "Green Bike",
a local non-profit bike shop,
kept me thinking about using Bicycle rims to form the Ball.
Bicycle rims are surprisingly light, and extremely strong.
The Sudiball consists of five rims:
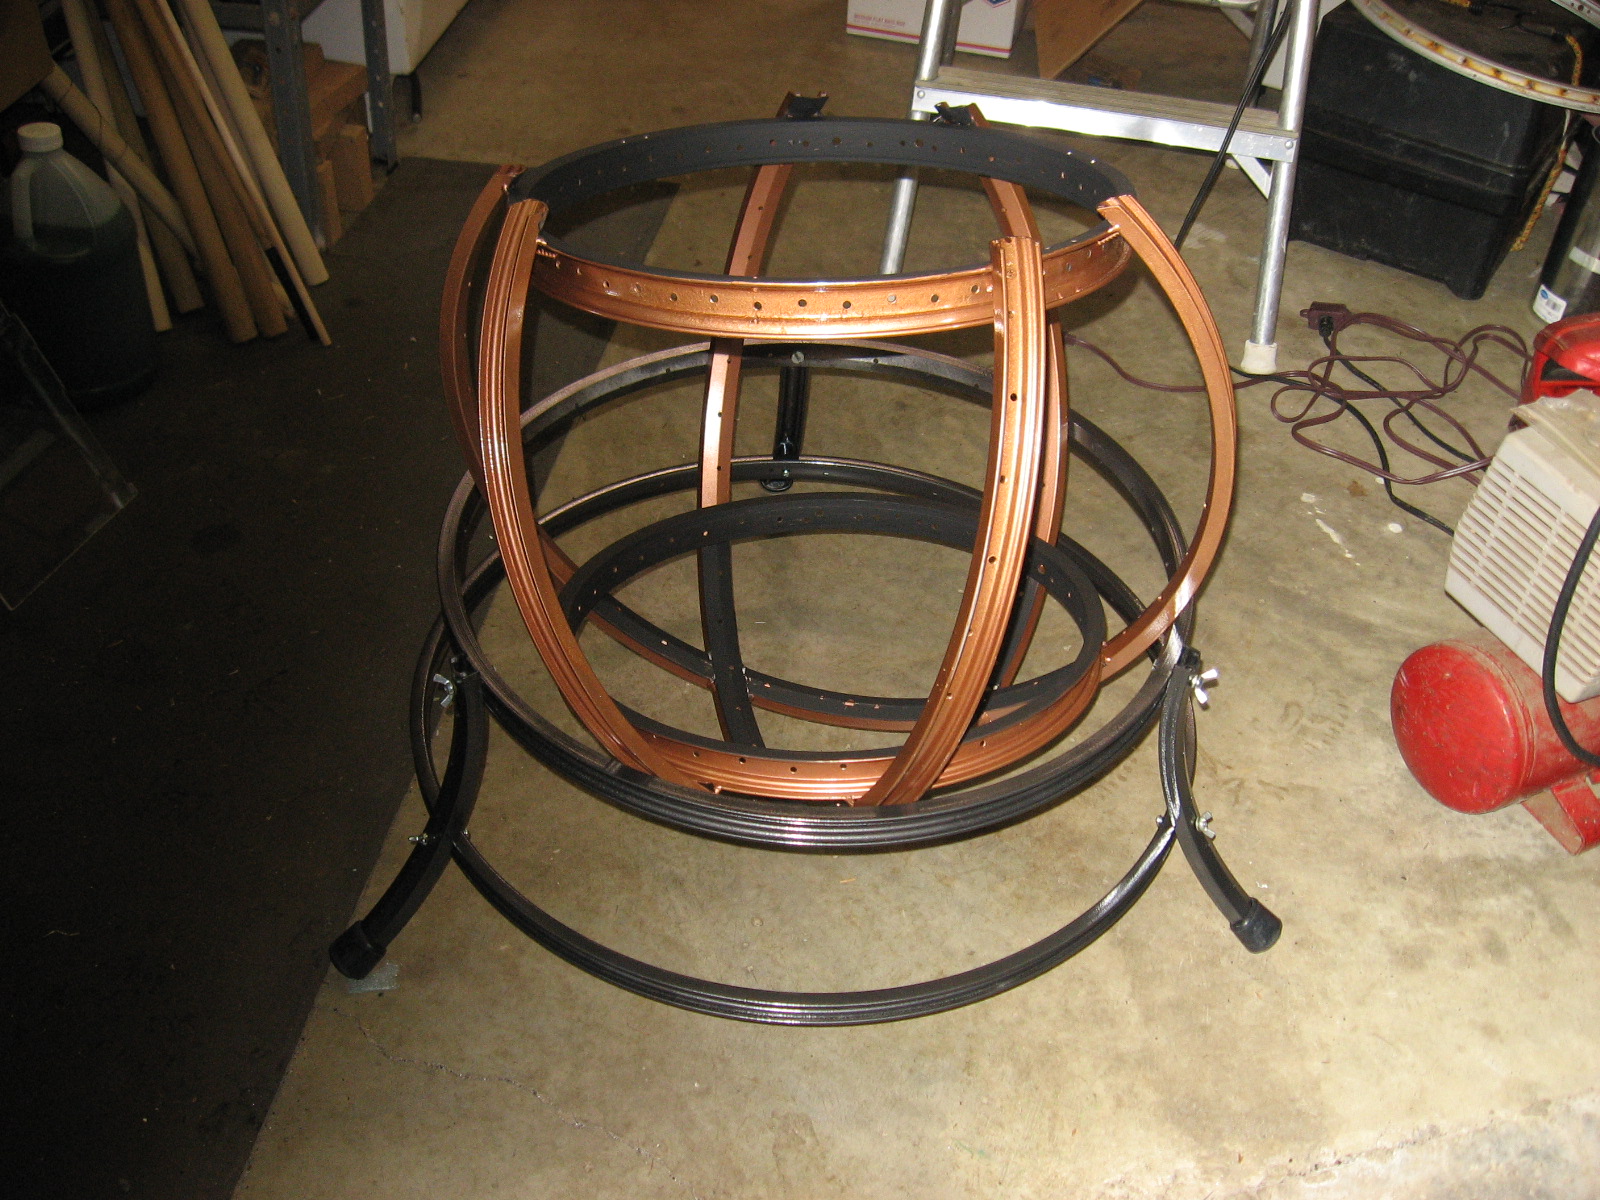
Staying with my supply of bicycle parts, the cables are re-cycled brake cables,
which are pre-stretched from use, and strong.
(When is the last time you adjusted the brakes on your bike?
Chances are it was from brake pad wear, not the cable stretching.)
Besides, the tension used isn't that great as it is the cable geometry that matters more.
The cables are covered with black quarter inch surgical tubing to dampen vibration.
The support wires are not in the light path of the primary mirror.
I chose "hammered" finished paint and colors to keep with a "steam punk" look.
A painted 14" flower pot tray protects the mirror
The ball itself is lightweight, weighing in at five and a half pounds including the mirror cell.
The poly pipe lined socket stand weighs in at three pounds.
(Polyethylene Flexible Pipe on the socket rim is used as a bearing surface)
The 13.1" diameter 1-&-1/8 inch thick Coulter mirror weighs 12 pounds.
Strut, secondary assembly, brackets, cables, and ... miscellaneous
(eight pounds of counter-weight unfortunately.)
brings the total scope and mount weight to 34.5 pounds
a savings of 85.5 pounds from the Coulter's original weight!
The movement of the Sudiball in the socket compares favourably with the Coulter's movements
Over-all, I'm happy and feel our goals were met.
A lighter secondary would eliminate some counter-weight, and get closer to my weight goals.
The 3-&-1/2 inch diameter, one inch thick Coulter secondary mirror assembly was heavier than I anticipated.
The mirror is fiberglassed to a 45 degree 3/16" metal bracket.
I was afraid to remove it for fear of breaking the secondary.
I wound up drilling holes in the metal vane to reduce the weight.
I detect a movement of about 1/8th of an inch of the collimating laser on primary.
This to due to the weight of the secondary assembly causing the secondary support to torque.
I'm going to look for a lighter secondary mirror.
If you decide to make a Sudiball from bike rims,
be advised that the compound tilted blade Sudiball requires much more accuracy
than the radial bladed (Cloverball style) ones.
Once you remove the spokes the rim ceases to remain round.
Even new un-spoked rims when cut, spring out of shape,
as they are manufactured with tension built in.
It takes a good bit of work to manoeuvre them into shape and hold them in place for welding.
A much simpler solution is to go to Toms' instructions on this site.
I first learned of psudo-balls or "Sudiballs" as Tom likes to call them, from Tom.
He has done all the work for you, you can download CAD files,
and print patterns for cutting the rims out of plywood or other sheet material.
I'd like to comment on discussions I've seen on "Cloudy Nights" concerning Sudiballs.
A number of people have made models and had trouble with the rims of the balls catching
on the socket rim.
The reason for this is they are using socket rims that FLEX, i.e. plastic buckets,
or cones made out of a flexible material.
You have to use a socket rim THAT WILL NOT FLEX!
This seems to have lead people to the conclusion Sudiballs are not viable,
nothing could be farther from the truth!
I also think it would be easy to make a socket for the Sudiball that would pivot like a Poncet platform, I may try that later.
I hope this project inspires others to move outside their comfort zone and consider building a Sudiball,
they offer so many advantages over a standard Dobson design.
Chuck
2018 Sep 1